Before you begin: First, create a “lastname_autoCAD_9” folder on your network space for this assignment. Save all of the following drawings into this folder.
The contents of this assignment: In this assignment, students will be learning how to use the AutoCAD POLYGON Command.
The Tutorials:
VIDEO FOR AUTOCAD 9:
The Problems:
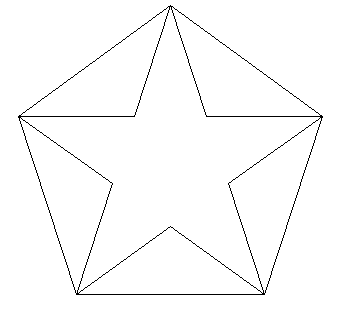
***DRAWING 1: Using the POLYLINE and TRIM, recreate the figure below (HINT: Start by creating the POLYGON, then draw in the lines from corner to corner, just like you did when you were making stars in Elementary School. Then, trim out the middle lines!):

***DRAWING 2: Using the POLYGON and TRIM Commands and any other AutoCAD tools needed, recreate the figure below. (Hint: Start by creating a circle and inscribing an 8 sided POLYGON, then connecting one corner of the polygon to the five sides opposite the corner. THEN, use the POLAR ARRAY Command to complete the other lines. THEN, trim out lines in the center of the figure. Can't TRIM the lines because they are ARRAYed? Use the EXPLODE command to return all of the lines to their original configuration!)

****DRAWING 3: Using the POLYGON and CIRCLE Commands, recreate the figure below. Use CTRL-1 to bring up the PROPERTY Panel to change each POLYGON to the appropriate color, as indicated in the figure. (Hint: Draw the circle of a fixed DIAMETER, say RADIUS 5.0, then INSCRIBE the various POLYGONS inside that circle. ROTATE polygons as needed to line them up properly!)

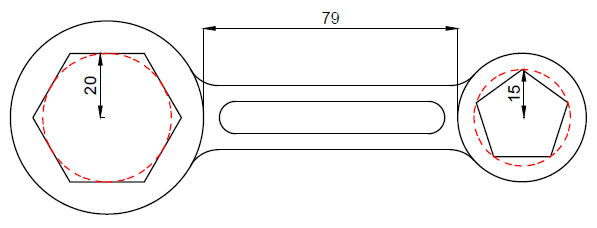
CHALLENGE PROBLEM- DRAWING 4: Using the POLYLINE Command and any other AutoCAD tools, recreate the figure below. ESTIMATE any dimensions not shown on the figure. DIMENSION when complete, as in the drawing.

CHALLENGE PROBLEM 2- DRAWING 5: Complete the drawing on PAGE 957 of the RED BOOK. If you wish, you can follow the tips and tricks on the top of the page to assist you with your drawing.