Before you begin: First, create a “autoCAD_5” folder on your Q: DRIVE folder. Save all of the following drawings into this folder.
The contents of this assignment: In this assignment, students will be learning how to use the ARC command and the extremely useful AutoCAD MIRROR Tool. Because these problems are a little tougher than usual and do include dimensions, this will likely be a two day assignment.
The Tutorials: Before beginning, review the following Tutorials, please make sure to practice the steps as you watch, especially on the ARC tutorial:
-
VIDEO TUTORIALS FOR AUTOCAD 5- AutoCAD ARCS, Video #37:
AutoCAD MIRROR, Video #49
:
The Problems: DIMENSION EACH FIGURE AS IT IS IN THE BOOK! Please make sure that you use your new BLUE_DIM_STYLE.dwt template as the start of each problem so that your dimensions are BLUE.
DRAWING 0: Please note that, for this AutoCAD assignment, I expect students to have also reviewed how to use the FILLET and CHAMFER commands, as well. The PRACTICE FILE for this is the first problem that I will grade for this assignment, so make sure that it is saved in your AutoCAD 5 folder.
DRAWING 1: Page 50, Problem 11. (Replicate this as closely as possible.
You will be using the ARC command. Put both views of the hammer head
on the same page and file. Use the MIRROR Command to make the top and
bottom of these figures perfect.)
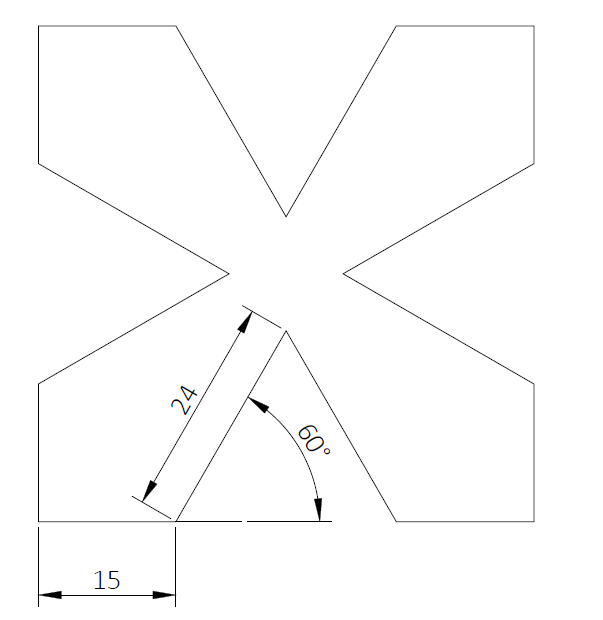
DRAWING 2: Replicate the figure below. (DRAW only the two lines that are dimensioned! The rest of the problem can be completed using ONLY the MIRROR command!
DRAWING 3: Draw the following figure. Make use of the ARC command to create the outer arcs, use the MIRROR command if it is helpful. The small rounded corners are RADIUS 10!

RECTANGLE TOTAL WIDTH= 240, HEIGHT= 160
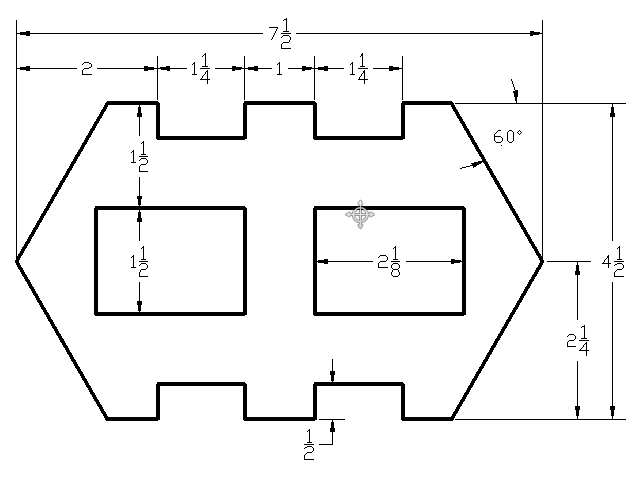
DRAWING 4: Replicate the Figure below. Use the MIRROR command to assist:
DRAWING 5: Page 237, problem 1. (Draw the figure on the page. Use the MIRROR command to complete the figure by MIRRORing the left side of this figure to the right side.)
DRAWING 6: Page 918, Problem 28. (I highly recommend using the FILLET command to create the curves to the
left side of the figure.)
CHALLENGE PROBLEM, DRAWING 7, Replicate the drawing below, use the MIRROR command to create the full figure shown in the lower right corner. The instructions at the base mean that FILLETS (rounded corners) are all radius .125 and all CHAMFERS ("cut corners") are angle 45 degrees and length .125 (there are commands to help with each of these operations, if you would like to do some independent learning!)
 .
.