BEFORE YOU START: Create a new folder on your network space, called FUSION_360. In this FUSION_360 folder, create another new folder called “LESSON_3”. You will need to EXPORT your drawings as .F3D files and save it to your LESSON_3 folder for grading!
THE RELEVANT VIDEO TUTORIALS: You will NEED to watch this video to be able to complete this assignment.
PROBLEM 1: Complete the "PAPERCLIP" exactly as in the video. Please liven up your model a little bit by applying a MATERIAL, such as GOLD CHROME or PURPLE PAINT. SAVE YOUR MODEL WHEN COMPLETE AS PAPERCLIP.F3D to your LESSON_3_FOLDER.
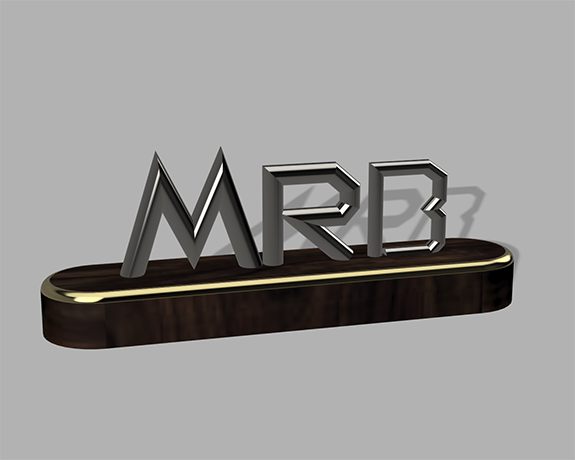
PROBLEM 2: Please use the techniques described in the SWEEP tutorial to make a wire version of your name in FUSION 360. You will need to first sketch your name, using the LINE tool and any other appropriate commands. I HIGHLY recommend that you do this one letter at a time, that might make it easier. Please do this on the XZ plane, so that your letters will stand up at the end. Then, SWEEP it and RENDER it in a material that is pleasing to you. Then, create a nice WOOD RENDERED BASE for your wire name and put the two pieces together to create a little "Nameplate" for yourself. SAVE YOUR MODEL WHEN COMPLETE AS NAME.F3D to your LESSON_3_FOLDER. Here is Mr. B.'s wire name model:

PROBLEM 3: Time to put your SWEEP skills to good use. Please recreate the famous "PENROSE TRIANGLE" optical illusion that we discussed in our previous BELLRINGER, seen here:

Now you may not actually know how to do this, so I will help. Here is a VIDEO TUTORIAL that will be useful. Please note that you will need to RECENTER your image when starting a new SKETCH by clicking on the UPPER FRONT CORNER OF THE VIEW CUBE EACH TIME:
Please use MATERIALS to give your PENROSE TRIANGLE an appealing look, such as this one from Mr. B.:

SAVE YOUR DRAWING WHEN COMPLETE AS PENROSE_TRIANGLE.F3D to your LESSON_3_FOLDER.
PROBLEM 4: Let's see how you do combining a couple of the skills that we have been working with over the last two lessons. Please create a model of a Glass, similar to the type you would get in a restaurant, using the skills from past lessons (REVOLVE and SHELL.) Make sure to FILLET edges of your glass and apply a GLASS material. To put into the glass, please create a model of a PLASTIC straw, using the skills from this lesson (SWEEP.) Please make sure that your STRAW is hollow, using the SHELL command.
CHALLENGE PROBLEM: Include a model of the "drink" that is inside your glass, as well. This should fill up exactly the inside of the glass to a level height. NOTE: The liquid options are very difficult to see on your model. I used an enlarged WOOD material to make my drink look like "Coca-Cola." FOR A SUPER CHALLENGE, CREATE A COUPLE OF ICE CUBES (USING THE PROPER MATERIALS!) TO BE FLOATING IN YOUR DRINK.
SAVE YOUR DRAWING WHEN COMPLETE AS GLASSANDSTRAW.F3D to your LESSON_3_FOLDER. Here is Mr. B.'s model of a glass with straw and drink:

SUBMITTING YOUR WORK: I will grade all of the problems for FUSION_360_LESSON_3 Directly out of your folder on your COLOR Drive.
GRADING: I will be grading FUSION_360 work in the following way. I will be grading your completed assignments and figures each week. There are 4 figures for this assignment, so this assignment will be worth a total of 80, 20 points for each of the practice problem and the independent problems.